
Cyanotype Printing
Create beautiful high contrast Blue and white prints using found botanicals and the power of the sun.

A Brief History
Cyanotype is a photographic process that dates back to 1842.
Sir John Herschel invented it.
Anna Atkins made it famous. Anna was a botanist and one of the first female photographers, who made it famous by using it to document plant specimens. Her beautiful blueprints are considered some of the earliest examples of photography used for both science and art.
The cyanotype process uses a light-sensitive solution made from iron salts.
When paper or fabric is coated with the solution and exposed to UV light (like the sun), it turns a deep, vibrant blue.
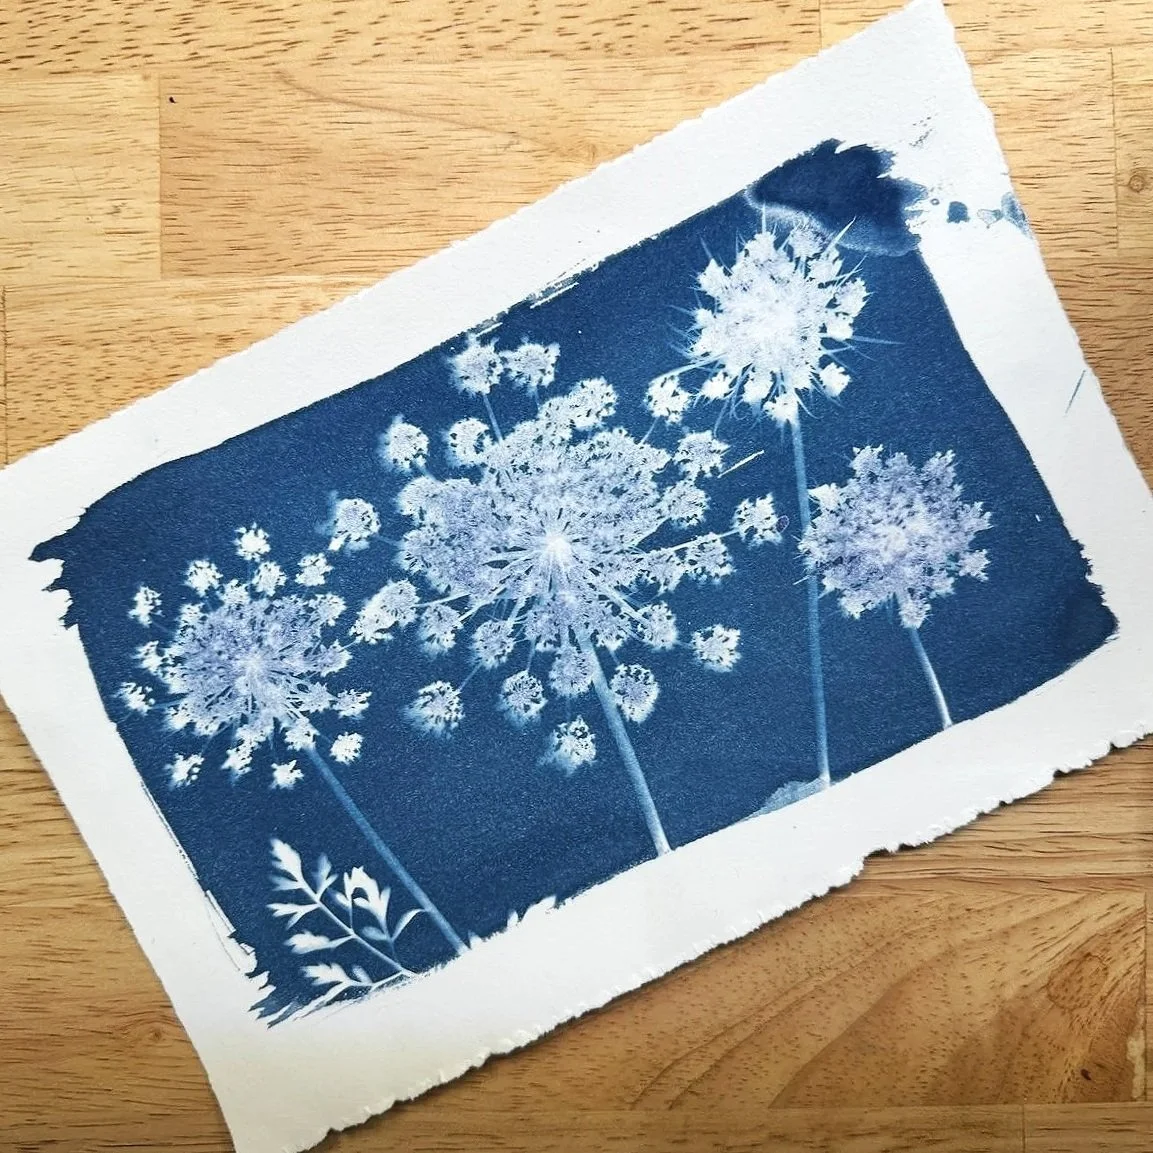
Anything that blocks the light, like leaves and flowers from your favorite plants, will stay white or lighter, creating beautiful silhouettes.
This is a simple, non-toxic, beginner-friendly project that both adults and children can enjoy.

Materials Needed
Cyanotype chemicals (ferric ammonium citrate and potassium ferricyanide). Don’t let those chemical names intimidate you. Many companies sell the solution you need. The one I use is Jacquard and can be found on Amazon or your favorite art supply stores like Blick Art Materials or Michaels.
Paper or fabric to print on (Natural fibers are best, think 100% cotton)
Photo Negatives, botanicals, or other interesting objects for your designs
UV light source (sunlight or UV lamp)
Foam brushes and trays for coating
a piece of cardboard, a clipboard, or a matboard to use as a backer board, a piece of glass, and some binder clips or clothespins. *You can take the backer board and the glass out of a photo frame for this.
Step-by-Step Process
Prepare the Sensitizer Solution
The chemicals for cyanotype come in two parts that need to be combined. If you are using the Jacquard brand I recommended above, the bottles come with a small amount of powder in each, and you need to add water to them. It is recommended that each sit for 24 hours for optimum results. When you are ready to coat your paper or fabric, you will need to mix part A with part B in equal amounts. A little goes a long way, and if you only plan to do one or two prints, I recommend just a teaspoon or two of each mixed with your brush in a glass container. Once mixed, the solution is only good for 2-4 hours, so it is better to mix too little and have to mix more than to mix too much and have to throw it out.
Coat the Paper or Fabric
Apply the solution evenly and let it dry in the dark. For paper, I find a foam brush works best, and for fabric, you can dip it in the coating and squeeze out the excess. You do not have to sit in complete darkness while coating your paper or cloth, but low light is best. A dim room with the shades drawn is fine. I typically lay my papers out between the sheets of newspaper and put them in a cupboard or closet to dry in the dark. Your paper or fabric will take on a yellow-green tone after applying the solution.
**If you think the process of coating the paper or fabric sounds like a whole lot of hassle, many companies sell pre-treated papers and fabric pieces you can buy and skip these first two steps and start creating immediately; however, you will have no control over the quality of your paper or fabric choice.
Arrange your design
This is the fun part where your creativity can really shine. Take your coated piece of paper, lay it on top of a piece of cardboard or a clipboard, something of the sort, and arrange the items you have gathered into a design that pleases you. Cover your design with a piece of clear glass from an old photo frame, and it’s ready to expose.

Exposure to UV Light
With your design ready, you’ll need to lay it out to expose it to sunlight or place it under a UV lamp. The amount of time you expose your design is something you need to experiment with to achieve the desired effect. I’ve found that with exposing botanicals, on a clear sunny day in the summer, it only takes about 4-5 minutes. Especially when dealing with delicate flowers or botanicals with fine stems. The more prolonged exposure tends to bleed under the delicate stems and through light colored flowers. More opaque things like large green leaves can be exposed for longer without the sun bleeding through. You’ll notice a color change in the coating on your paper, and you can remove your design from exposure anytime after that. If your design comes out mostly blue, with little detail of your botanicals, try exposing for less time.

Rinse and Develop the Print
After removing your print from exposure, you need to rinse it thoroughly in clean water. I typically dunk it in a tub of water or sink, swish it around a bit, and let it sit for three or four minutes. Then, I turn on the faucet and rinse for a minute or so to ensure all of the solution is rinsed away. Your image will start to reveal immediately as you begin to rinse. If you avoid rinsing thoroughly, you may end up with a blue haze in your prints from the residual chemical that is slowly exposed to the light as it dries.

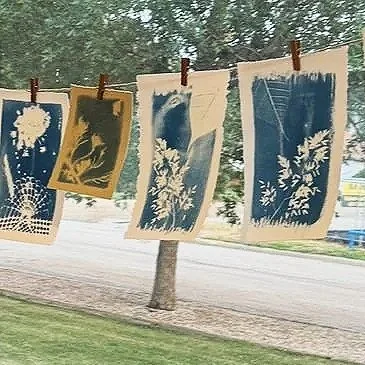
Dry the Print
Lay your prints on newsprint or towels to dry, or you can hang them from a drying rack or clothes line. Your print will continue to darken over the next 24 hours. If you would like your print to achieve its maximum deep shade of blue instantly, you can dunk it into a tray of water and peroxide to achieve the final color immediately.
Tips for Best Results
Use smooth, natural fiber paper for clearer prints.
Experiment with exposure times. You can do tests on small pieces of scrap cut off to prevent waste. Exposure times can be as short as 3-4 minutes up to a 1/2 hour. The strength of the UV rays will affect your exposure times.
Keep coated materials away from light until ready (I store mine in a box with a lid that one of my old day planners came in). For larger sheets of paper, you may need to lay them upside down and flat on a shelf in a dark closet or cupboard, or sandwich between two sheets of cardboard and tape them shut to keep the light out.
Learn from my mistakes
The quality of paper really does matter! I had some cardstock paper lying around that a friend gave me from her mom’s scrapbooking stash. I coated a bunch of it and folded it for small notecards for students to print on in one of my Try it Tuesday workshops. I had no idea if the paper was natural fiber or not, and I didn’t test it before coating upwards of 50 sheets. Thank goodness I had a forgiving group of students, and the whole premise of my workshops is to try things and experiment. We learned a harsh lesson that these scrapbook papers did not hold the coating well, and nearly all of it washed away in the rinse phase. Thankfully, I had a backup from my personal stash of papers. Two papers I have found that work exceptionally well are Legion Stonehenge and BFK Rives, both of which are artist-grade papers I purchased through Blick Art Materials.
Save yourself time by making notes on the back of your most successful prints. Note the date, time of day, temperature, whether it was cloudy or clear, and how long you exposed the print for. This will give you something to look back on and help you to have an idea of where to start the next time you go to make a print, and hopefully will prevent you from having to do an excessive amount of tests to get the correct exposure times.

Fun items to consider in your print Designs
Botanicals, of course, are my go-to. I find that the more delicate, dainty flowers, leaves, and grasses work best. Large flowers make for a fairly uninteresting white blob on the page.
Photo Negatives To convert a photo to a negative for free, you can use online tools like Creative Fabrica or Pixelied, or mobile apps such as Negative Me. These tools allow you to upload your image and apply an "invert" or negative filter, effectively turning the colors to their opposites. You can also use Adobe Photoshop if you have access to it. You can then print them onto transparent transfer sheets to use in exposing for cyanotypes.
Grandma’s crochet doilies and lace. I have had some great success making prints of these items. This is an enjoyable way to share a piece of family history with other members of the family who weren’t lucky enough to inherit the goods 😉
Fabric with a loose weave that’ll let the light through, think cheesecloth, or maybe a scarf or sweater with a loose weave
Cut or textured glass. Envision all the wedding crystal you’ve never used with the cut and frosted glass designs on them. The cut facets of glass make for an interesting play of light and shadow when you expose the print.
Bubble wrap, fruit netting (from your bag of oranges), string, yarn, etc.
Rice, seeds, nuts. These can be sprinkled on or arranged into intricate patterns.
Household items, paper clips, keys, scissors, pencils, paint brushes, anything with a shape or texture you find interesting.
Stencils, or paper cutouts, can be used to create silhouettes, too!
Happy Printing!
The key to any project like this is to keep your mind open and try things even if you think they might not work. You never know what surprises will reveal themselves. Have fun, and let me know if you try this project. I would love to hear about your experience! If you discover something that causes a fun print effect, please let me know in the comments below so I can update the suggestion list!
